

Earning from Google AdSense is one of the first dreams most bloggers have at the beginning of their careers. They work day and night to drive maximum traffic to their site and live this dream over and over again.
In case you are also a blogger and want to monetize your blog, then give Google AdSense a shot without a second thought.
This is the best and most favorable monetization method among young bloggers from all around the globe.
What Is Google AdSense
Google AdSense is Google’s advertising network through which it helps brands promote their products and services. Google uses blogs and YouTube channels to place ads and share its revenue with publishers. This win-win arrangement is quite popular among bloggers and YouTubers from all over the world.
The more traffic a site gets, the higher will be its earnings. This is the reason why publishers use various SEO techniques to improve their site rankings and traffic. The minimum threshold limit for AdSense payment is $100.
Now that you have understood what Google AdSense is, the next step is to learn to add Google AdSense code to your site. Unless it’s done, you cannot monetize your blog regardless of its rankings and design.
In this guide, we have mentioned different steps that are needed to get desired outcomes without facing any trouble. You can check them out and update your knowledge.
Creating Google AdSense Code
Even before learning to add Google AdSense to your blog, you need to first apply for a Google AdSense account. Make sure you have a Gmail ID. If not, then create a Gmail account first and then sign up for AdSense.
Once you’ve submitted the application, it might take anywhere from a few days to a few weeks to receive an email from Google telling you whether your application was approved or not.
If everything went well and your application was approved, you’d be asked to log in to your AdSense account and get an HTML ad code.
What you can do then is click on My ads tab on the Google AdSense homepage and select ‘New ad unit’ option.
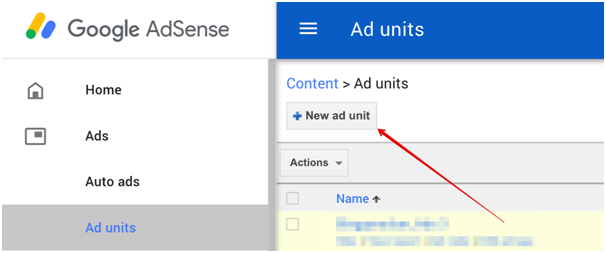
As soon as you do this, a new window will pop up where you’ll be asked to choose an ad type. Select ‘text and display ads’ from the given options.

At a later stage, you can also try ‘In-feed-ads,’ ‘Matched content’ or ‘In-article-ads’ depending on your requirements. But in the beginning, go for ‘Text & display ads.’
After selecting the ad type, you can give it a name and also choose an appropriate ad size, style, type, and color. If you’re unsure, continue with the ‘Recommended’ setting.

Please note that the name of the ad unit is to make sure that you can recognize it once you place ads on your blog. So, name it like ‘homepage ad unit,’ ‘sidebar ad unit,’ or anything else that can help you identify a particular ad unit in the future.
Don’t change the default settings related to ‘custom channels’ and ‘if no ads available.’
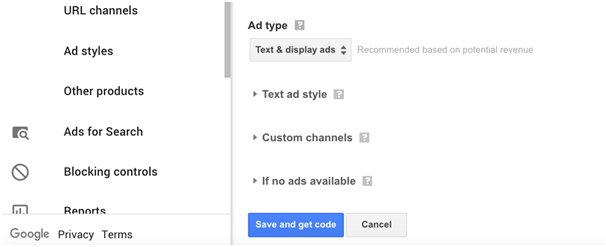
Click on ‘Save and get code’ button to get the ad code.
As soon as you do this, a new window with an HTML ad code will open. Copy this code and then click on ‘Close’ button.

Adding Google AdSense Code InWordPress Blog
Now that you have the AdSense code, the next step is to paste this code in your blog’s HTML so that Google can show appropriate advertisements according to your niche, target country, and user type.
Before proceeding ahead, install an ideal theme on your blog that works perfectly with AdSense. Even though all the WordPress themes support Google AdSense, none of them can beat the Ad-Sense theme from MyThemeShop which is solely designed to maximize your advertisement earnings.
Go for this lightweight, SEO friendly and AdSense optimized theme to experience a transformation right from day one.
Once you’ve installed it on your blog, go to Appearance >> Widgets in your WP-admin area.
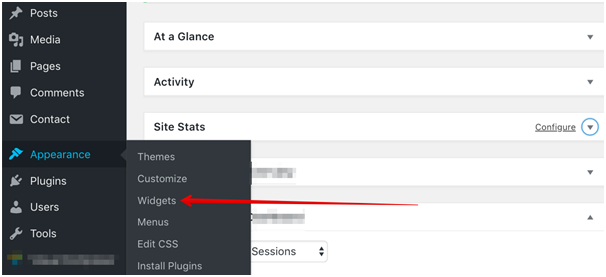
Here you’ll find multiple options. Go to ‘Custom HTML’ widget and paste the ad code that you had copied from Google AdSense home page.
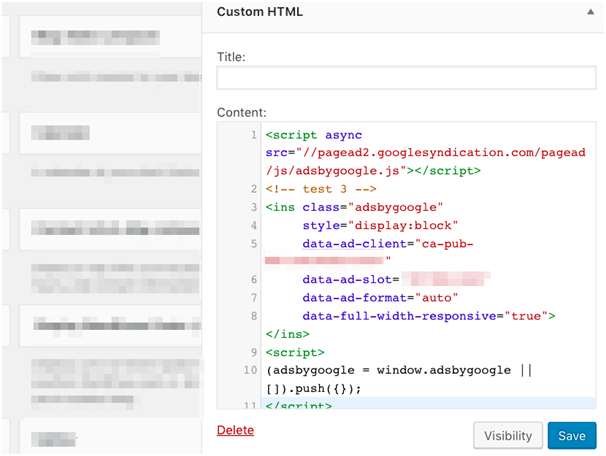
Now drag this widget to the appropriate area (sidebar, header, footer, etc.) so that the ad can start showing there.
In case you’re not technically sound, but still want to put ads in your favorite spots like between paragraphs or right beneath the featured image or any other key area, then use third-party plugins like ‘’Quick AdSense,’ ‘Ad Injection’ or ‘Ad Inserter.’ All of them come with multiple customization options and have the potential to increase your CTR by a considerable margin.
Just in case you’re not comfortable in using any third-party plugin, then go for Ad-Sense Theme’s inbuilt ad management system to finish off things without a hitch.
Once you insert ad code in a suitable place on your WordPress blog manually or with the help of the plugins mentioned above, click save and wait for a few hours. It won’t take long before Google starts showing real-time ads on your blog.
This is how you can add Google AdSense in any WordPress blog. Depending on plugins, the code insertion and customization process might vary, but overall the steps as mentioned above remain the same.
Comment below if you face any technical issue while inserting the ad code in your blog, and we’ll help you fix it as soon as possible.