

Form conversions serve as the linchpin in generating leads, dictating revenue, and drumming up your business. Do you know how many users are submitting your forms? Where do these potential leads come from? Why is there a drop in the number of form submissions?
Tracking conversions for form submissions, without a doubt, is an initial and vital step to understand the performance of your online marketing campaign. It also contributes to website optimization as well as identifying effective promotion strategies.
For instance, you offer free online courses via form signup. It’s necessary to track how many users get interested and download the courses so you can compare and identify which get a higher conversion rate.
In this article, we will showcase a step-by-step guide on how to track conversions for form submissions using Google Tag Manager, thanks to its versatility in tracking any type of form interaction on your website.
Let’s dive in!
- Get Ready with Google Tag Manager
- 5 Easy Steps to Track Conversions for Form Submissions with Google Tag Manager
- Step: Identify the Form ID
- Step: Create a New Tag
- Step: Set Up the Tag Type
- Step: Configure the Tag Trigger
- Step: Set Up Event Goal to Track Form Submissions
Get Ready with Google Tag Manager
To set up form conversion tracking using Google Tag Manager, you need to have an account first. Simply visit Google Tag Manager site and follow these steps:

- Fill in your account name.
- Add your site URL in the “Container Name” and choose where your container will be used. In this tutorial, we choose “Web,” then hit “Create.”
- Next, a service agreement will show up. Read it carefully and then click on “Yes,” which will take you to another page.
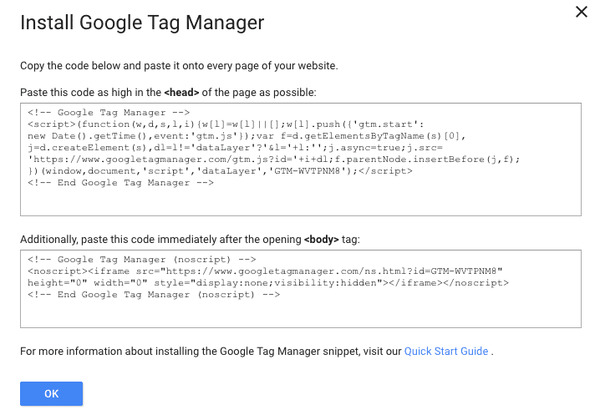
- This page provides 2 code snippets that contain all the relevant tags for tracking conversions. It’s necessary to paste them on every page of your site. Click “OK.”
Set Up Variables in Google Tag Manager
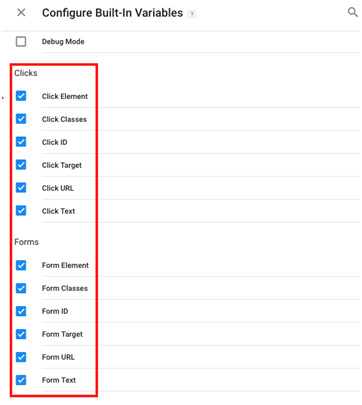
Variable setup is the first thing you need for your form conversion tracking. In your dashboard, click “Variables,” choose “Configure”, and there is a list of variables showing up. The image below describes the most common variables for your conversion tracking.
5 Easy Steps to Track Conversion for Form Submissions using Google Tag Manager
The process of tracking conversion for form submissions basically goes through 5 easy steps:
- Identify the Form ID
- Create a New Tag
- Set Up the Tag Type
- Configure the Tag Trigger
- Set Up Event Goal to Track Form Submissions
Google Analytics assists you in analyzing the conversion data. Make sure that you have the Google Analytics account and its ID.
Step 1: Identify the Form ID
To track conversion for form submissions, first, you’re required to identify the ID of the form you want to track. Right-click on the form and select “Inspect.” A window of code pops up, containing your form ID. In the following example, the form ID is 5.

Step 2: Create a New Tag
Embedding the container codes we mentioned earlier on your page and it will turn into this:

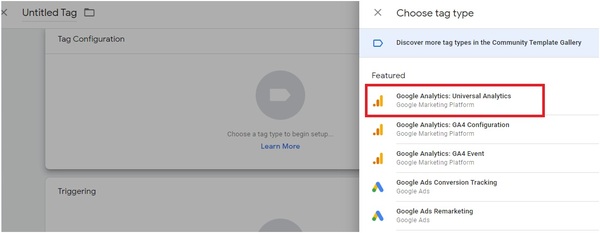
Create a new tag by clicking on “Add a new tag.” which pops up a new window. In the “Tag Configuration” box, select “Choose a tag type to begin setup…” to open a menu of tag types. Here, you must choose the type of tag you would like to use.
Because we’re going to connect Google Tag Manager with Google Analytics, we pick the “Universal Analytics” option (image 2).

Step 3: Set Up the Tag Type
After going for “Universal Analytics”, you will be taken to the next screen where you have to decide the tracking type and input event tracking parameters. The guide below shows you how to do in details:
- Select “Event” for Track Type.
- Type “Forms” in the Category field and “Click” in the Action field.
- Check the “Enable overriding setting this tag” box. This will bring up the “Track ID” field. Type in your Google Analytics track ID (Image 1). Lastly, click “Save” at the top right corner and you will be asked to create the tag trigger. We’ll cover it in the next part. (Image 2).


Step 4: Configure the Tag Trigger
After selecting “Add Trigger”, a popup window asks you to decide a trigger. You should see the “All Pages” trigger you already created in that window. Click on the plus icon will allow you to choose the trigger type (image 1). Select “Form Submissions.” (image 2).


On the next screen, check on “Some Forms,” which will bring up 3 other fields. Click on the first field and a long list of variables appears, including “Click,” “Form URL,” and so on. In this example, we select the “Form ID” variable. In the field “contains,” pick “equal,” and in the last field, type your form ID in. Put these components together, we will have “Form ID equals 5.” Finally, hit “Save.”

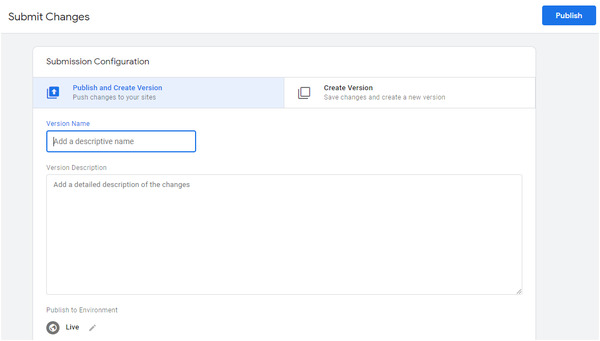
After that, the tool will require you to add a version name and version description. Simply type what you have changed to this version, then hit “Publish.”
Raw data of your new tag version will be presented on the next screen.
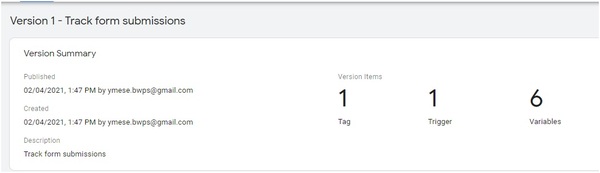
By now, you’ve successfully set up a form submission tracking tag in Google Tag Manager. You can use this tag to freely track conversions for your form. In the last step, we need the help of Google Analytics to set the Event Goal and view the conversion data.
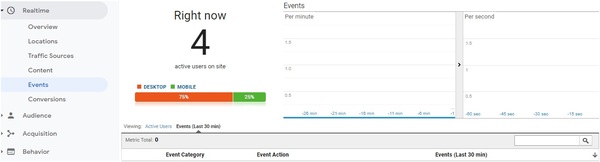
But first, open your Google Analytics, click “Realtime”, and you should see Event Category is Form and Event action is Form ID.
Step 5: Set up Event Goal to Track Form Submissions
Each time users finish a specific action that satisfies one or more conditions set in the Google Tag Manager tag, Event Goal will carry out the tracking right off the bat. Normally, these conditions are defined by these attributes: Category, Action, Label, and Value. The Event Goal will trigger if each of these attributes is executed.
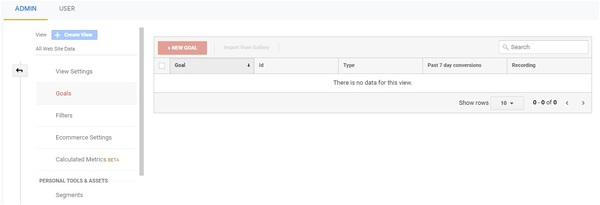
To set up the Event Goal, in the “Admin” tab, find the “Goal” tab and click on it. On the new page, choose “+New Goal.”
In the “Goal Set up” section, check on the “Custom” box and then click “Continue.”

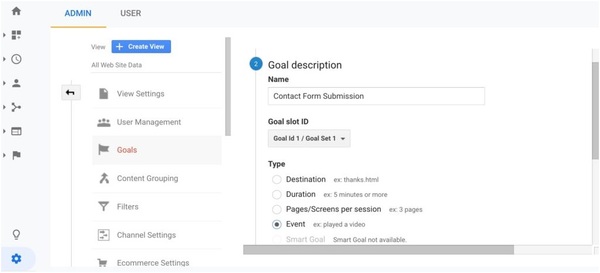
Under “Goal Description,” fill in your goal name, select “Event” and “Continue.”
In the “Goal Detail” section, type in “Form” as Category and “Click” as Action then save your changes.

Now, it’s time to test your goal. Back to your Google Analytics dashboard, click on “Realtime” and then select “Conversions.” If everything is set up correctly, your event goal will be recorded and you should see the number of active users on your site.
That is! You’ve completed tracking conversion for form submissions using Google Tag Manager and Google Analytics! It’s time to utilize your data and optimize your marketing plan!
Tracking Your Form Conversions Now!
We’ve guided you through the 5 easy steps to track conversions for your form submissions with the help of Google Tag Manager and Google Analytics.
To conduct conversion tracking for form submissions, you need to set up Google Tag Manager variables, then identify your form ID, create a new tag, and configure the tag type as well as the tag trigger. As soon as all the steps above are ready, you can use Google Analytics to track your form conversions by setting up the Event Goal.
Getting stuck in any steps above? Don’t hesitate to let us know by dropping a comment in the box below!