

Contact form, one of the most favored and long-standing conversation tools used for over a decade, from individuals to large businesses running websites on digital space, providing readers (visitors) or potential customers with a way to get in touch with you straight without leaving the website.
The design implemented in your WordPress website contact form can make-or-break things, this is why you should learn how to build on an appealing contact form to your WordPress website.
With the plugin, you can set up an attractive contact form with no trouble. There are a number of premium and free plugins you can find that can help you to do so.
We have chosen Contact Form 7 which is one of the best plugins and also very quick and easy to install.
Launched in 2007, Contact form 7 has been downloaded over 5 million times so far, making it one of the most favored contact tools among WordPress website owners. Though it is easy to implement it on a website, many beginners trouble setting it up and using the plugin properly.
Wait! Why contact form 7?
- It is free to use at as many sites as you want.
- It is easy to customize.
- It has CAPTCHA support to keep bots away from your site, avoiding spam submissions.
- It works with any modern WordPress theme.
- It comes with a simple contact form, helping you create a clean contact form in a few minutes.
- It has an in-built form that can be set-up at one click.
Unlike premium contact form plugins, setting up contact form 7 might be a bit tricky for beginners as it requires technical knowledge of tags.
To help you implement a clean contact form on your website, we are going to provide you a step-by-step guide in which we will discuss:
- How to Install Contact form 7 Plugin?
- How to add a contact form to your WordPress website?
- How to use a default form?
- How to create a new form?
- Use of tags to add or remove fields in the form
Steps to install and set-up Contact form 7 on WordPress
Step 1: Install Contact form 7 Plugin

- Login to your account: Log in to the WordPress admin dashboard or type on the URL box www.your-domain-name.com/login/ to go to the admin dashboard.
- Add plugin: Head to the WordPress admin dashboard and click on Plugins in the sidebar menu.
- Now click on “Add New” to install a new one.
- Type contact form 7 and it will appear on the search result page.
- Click on install now and when the download is finished, tap on the Activate button.
Now you have successfully installed Contact Form 7 plugin. With installing this plugin, you will see a new menu item “contact” where you can manage all your forms and create a new one as well.
Step 2: Add a contact form to your WordPress website
Upon installing the plugin, you will have a contact option in the sidebar where you can create a new form or choose a default form to use.
How to use the default form?
- Navigate to default form: Contact >> Contact form >> Contact form 1
- You will see the Contact option, click on it, and navigate to the Contact form and here you get Contact form 1 (it is your default form) and a shortcode written alongside it.
Look for a shortcode which will be like;
[contact-form-7 id="12345" title="contact form 1"]Copy the shortcode and paste it where you want your form to show. This code can be inserted on any page/post.
How to use a New form?
Additionally, you can add a new form, and making a well-customized form is a straightforward process. Simply, head to Contact > Add New and give a name to your new contact form.
In the end, click on the Save button. Now you have successfully added a new form and the next step is to give it a new look or add extra fields with form and email tags customization.
Step 3: Customize your Form
Making changes to the contact form requires an understanding of three kinds of tags as following;
- HTML tags
- Form tags
- Mail-tags
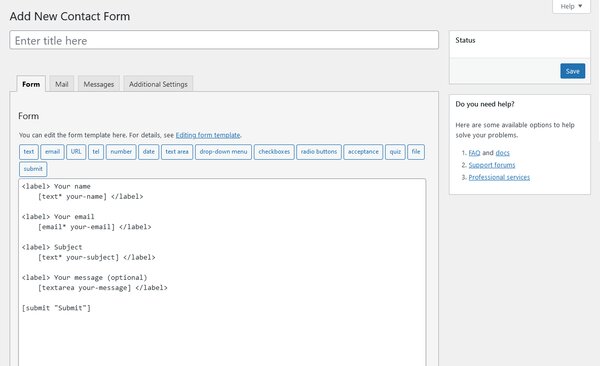
In steps to modify the form, click on the contact and select the form you want to redesign and proceed. You will get a screen containing labels to make changes to the form and HTML code written below it, accompanied by pre-generated tags as follows.
Back-end Code:
<label> Your Name (required)
    [text* your-name] </label>

<label> Your Email (required)
    [email* your-email] </label>

<label> Message
    [textarea your-message] </label>

<br>

[submit "Send"]
The above-mentioned code contains:
- HTML tag
- Pre-generated form tag
By default, you will get Your Name, Your Email, Subject, and Your Message in your form, and very probably you would like to keep them all. The changes made to this code will reflect on your website.
Furthermore, you wish to add a few more fields to your form, this is where you have to be familiar with tags.
What are pre-generated tags?
On the top of the text area (below labels) it shows you a bunch of some helpful tags like text, email, URL, text-area, reCAPTCHA, etc., These are a few basic tags that you can use to add extra fields to the form.
Let’s say you want to add a telephone field to your form. To do so, click on “tel” which will generate you a from-tag.
In steps to use the form tag to add a telephone area on your form, copy the form-tag and put it inside the HTML code to display the telephone label or field on the front-page.
In the same way, you can add various fields by combining the form-tag with HTML tags. The syntax to add form-tag inside the form is as follows:
Syntax:
<label> Text….
 	  [form-tag]
<label>
Tip: You can generate a form tag by selecting the tag-generator button and place it inside the HTML tag to make changes to the form.
Step 4: Review Email setting
This is the page to set the recipient’s email address, sender’s email address, subject & additional information.
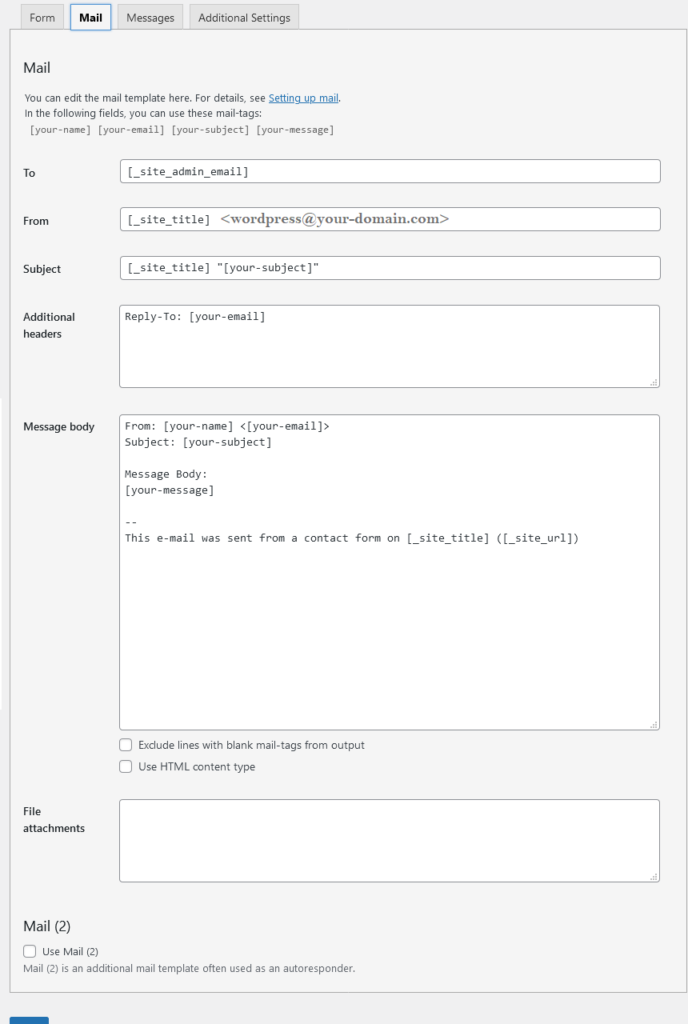
To: Enter the correct email address as this is where all the submitted forms will be sent. You can use any valid email address here. By default, Contact Form 7 will add the email address linked with your WordPress user account. Check if you have linked a valid email address there.
From: Contact form 7 will also assign wordpress@your-domain.com in this area. This is the field from where you get the contact details of senders from your WordPress website.
Subject: This field is used for the subject you receive in your email. By default, it will be Site name “[your subject]”.
Additional details: You can update additional information such as message body, and additional header.
You can learn more about form-tags & email-tags from this page.
Final Words:
Contact form 7 is one of the most reputed contact plugins used by millions of developers across the world. What’s more? It is completely free which is among one of the compelling reasons which set it to stand out from other contact form plugins.
Setting up Contact form 7 requires basic knowledge of HTML and acquaintance with form-tag and email-tag. On the other hand, beginner-friendly premium plugins like WPFroms, gravity forms make contact form installation super quick and easy.
A visually appealing functional contact form is crucial for businesses and individual users. When there is no option to communicate with you, no way to get in touch with you – which leaves your efforts unavailing.
We hope this article helps you in setting up contact form 7 on your WordPress website. Please let us know if this method works for you and if you have any questions or queries further in the comment section.