

Be careful while moving your WordPress website to a new host because there is always a risk of higher downtime and data loss. There could be multiple reasons for the WordPress migration, but choosing the right option is always crucial when it comes to hosting a website to a new host.
With the in-depth knowledge and implementation techniques, make sure you migrate your WordPress website to a new host, without any downtime. Here, in this blog post, we will share you the six conclusive steps that will help you execute the WordPress migration process successfully.
Although migrating a WordPress site from one host to another is a simple process, there are some complexities that would create certain problems for you.
To help you get your job done, we will share the step-by-step process of moving a WordPress site to a new host, with Zero downtime. But before this, ensure that you choose a trusted new hosting server for your WordPress site.
Selection of a new host
The journey of WordPress migration starts with the selection of a new host for your WordPress website. So, make sure you choose a reliable hosting provider that can meet your current expectations and has a potential to fulfil your future aspirations.
You should keep your specific bandwidth and server space requirement in mind while selecting your new host. It’s because the performance of your website will largely depend on how much bandwidth and server space you can extend when your business grows.
If you are looking for an ideal host for your WP site, you must examine the companies on the basis of following parameters:
- Trusted share hosting
- Cloud-based or remote hosting
- Dedicated hosting
Quick Tip: Make sure you have the details of both your old as well as new hosts. Also,don’t forget to have an access to FTP tool.
So, now we can start with the steps of migrating a WordPress site to a new host with zero down time.
1. Back up all the files of your site
We start this migration process with the backup of a WordPress site. Being a site owner, you should always backup your WP-content and WordPress database files before making any major changes. However, there are plenty of plugins available in WordPress repository for this, but we will backup a site manually. So, first we will download the wp-content directory from your old host:
- Use the FTP program such as Filezilla and connect your WordPress site.
- Copy the wp-contents directory from your old host.
- Paste it to your local computer.
You can also use a File manager from host’s cPanel to backup your contents directory. The best thing about using cPanel is that you can easily compress your wp-content folder and download it into your local computer. So, if you are planning to use cPanel, then consider the following steps:
- Login into the cPanel and access the File Manager
- Hit on public_html and select your site’s directory
- Select wp-contents folder and compress site
- Now, download the compressed file into your local computer.
Tip: This may take longer depending upon the size of the files.
Now, we will backup WordPress database files using cPanel:
- Under cPanel, go to the phpMyAdmin
- Choose your database and click Export
- Select SQL Format and hit on Go button
- This will export your file to the folder available in your local computer.
Quick Tip: Since .htaccess file is set to be hidden, you can ask your FTP program to let you display all the hidden files.
2. Create a WP database on your new host
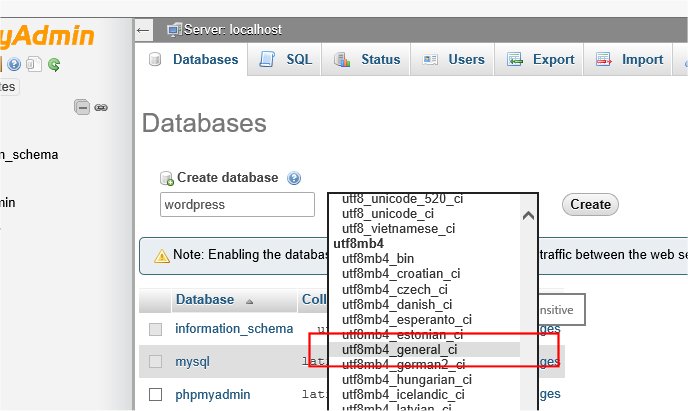
Before beginning the migration process, we will need to create a WordPress database to let you import all of your SQL data into it for easy installation. For that, you need to login to your new host using the username and password supplied by them and connect to the cPanel software.
To make this process simpler, we will use the MySQL Databases application. If your new host doesn’t have this application, you can ask them for their own way of creating new databases. So, let’s create a new database using following steps:
- Access MySQL Database
- Create a new database using relevant name for your site.
- Create a new MySQL username and strong password
- Add this user account to new database and mark it All Privileges.
Quick Tip: Don’t forget to jot down the database name, the new username and password of your new MySQL in a safe place. This will be required in the latter steps.
3. Editing the wp-config.php file
In this step, we will open the folder of all the WordPress site files that you downloaded into your local computer. There you will see a file named as wp-config.php that manages the access between WP and your database.
Since this is one of the most important files of your site, make sure to create a copy of it and save it on your local computer. Now, browse the original version of wp-config.php file using most reliable text editor and make the following tweaks:
(a) Change the database name
To change the database name, you will need to add the following line of code into the wp-config.php file:
define(‘DB_NAME’, ‘db_name’);
Tip: Add the new database name in the place of “DB_Name.
(b) Tweak the Database Username
Adding the following line to change your DB username with the new one:
define(‘DB_USER’, ‘db_user’);
(c) Change the Password
Now, we will change the database password with the new one using the following piece of coding:
define(‘DB_PASSWORD’, ‘db_pass’);
Now, save the changes in your wp-config.php file.
4. Importing the Database
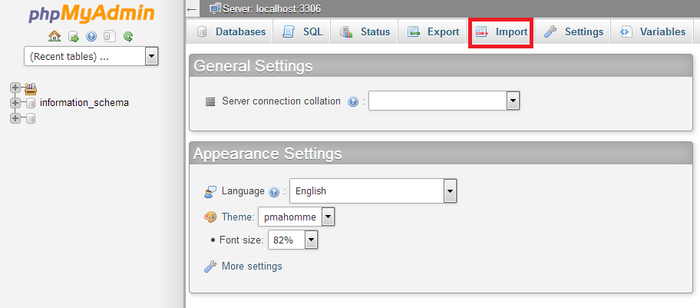
Once after creating the environment for your new database, you will need to import it to the new host. Using the following steps, we will begin our import process:
- Launch phpMyAdmin from the cPanel on your new server.
- Choose the new database which available in the list on the left sidebar.
- Select the Import tab from the navigation menu.
- In the File to Import portion, hit the Choose File button and choose th SQL file (that you exported in the previous steps).
- Un-check the “Partial import” box, set the format to SQL and click the “Go” button. This will start the import process of your WordPress database.
5. Uploading the files to the new host
This step is all about uploading your WordPress files to the new hosting server. For that, you will need to connect to your new host using your FTP program. Then browse to the folder that you have downloaded on your local computer. In case it is the first time, or the only site being installed on this server, then uploading the files to the public_html folder would be the most general directory.
Now, upload your site’s files using the selected remote directory. Don’t forget to add the updated version of your wp-config.php file.
Quick Tip: Save all these files on your local computer as they can be needed anytime until you finish this migration process.
6. Link to New URL and Mention the New Domain
When a user adds the links to the other posts by pointing to the URL on the server, then there is a good chance that it would show an error page to the web visitors. It could break when you are shifting over to the new domain.
To solve this problem, you will need to change your old domain name with the new one.
On the other side, you will also need to change the URL of your site to reduce the down time. By changing the URL, you will be taken to the new domain instead of the old one when you login to your site.
7. Reconfigure your DNS settings
This is the final step. Under this, you will need to configure the DNS designs of your domain. Since they will be pointing to your host, make sure you point it to the IP address of your new server.
So, you can take all the details from your domain registrar to make the changes. And the worst part is that DNS changes may take more than 48 hours. So, you can do it when you receive lower level of web traffic. At that period of time, don’t try to make changes to your site as they may happen with your older version of time.
Conclusion
These are the seven effective steps that will help you migrate your WordPress site to the new host, without any downtime and data loss. With the use of manual approach, you will be able to move your old site and database to your new host in a matter of few hours.