
For the past few years I have been working with the Spring Boot web framework to develop Java apps. The most recent project I’ve been working on is called Initial Commit, a website and series of guidebooks that help curious developers learn how their favorite programs are coded.
I developed the website using Spring Boot, and discovered an extremely convenient way to deploy my application on Amazon Web Services (AWS) using the Elastic Beanstalk service. In this article I will describe the steps that I use to build, deploy, and maintain the Initial Commit website.
Before we get into the technical details and tutorial, I want to touch on the reasons I decided to use AWS to host the website in the first place. The primary reason is that AWS offers a service called Elastic Beanstalk, which makes it very easy to deploy and host various types of web applications including Java apps packaged as JAR files.
Elastic Beanstalk allows me to deploy my Java app without having to spend any time setting up, configuring, or maintaining a web server. The web server and hosting are integrated into the Elastic Beanstalk service, so all I need to do is upload my Java JAR file to AWS and click a button to deploy it. This is extremely convenient, especially if you are used to doing things the old-school way and configuring web servers manually.
The second reason I chose AWS is the very reasonable cost structure. I spend about $30 per month in costs associated with running my services, and in my opinion this is well worth the convenience that it provides me as a developer. Also keep in mind that in general, AWS offers a “Free Tier” level which grants free services for one year assuming you stick to a relatively basic server like the T2-micro, so your first year of service will likely end up free. After that I’d say to expect about $30 in costs per month for a single server application.
Now let’s move on to actually setting up and deploying a Java app on AWS Elastic Beanstalk. Here are the steps we’ll be going through:
- Build the application JAR file using Apache Maven
- Create an AWS account, log in, and set up billing info
- Create an Elastic Beanstalk environment
- Upload and deploy the application JAR file
- Access the running application using an Internet browser
Step (1) is very easy assuming you are familiar with Java apps and are using Apache Maven as your dependency management and build tool. All there is to do is to open a terminal window, browse to the root directory of your Java project, and run the following command to build the JAR file:
mvn -DskipTests -Pprod clean install
Note that in this example we are using the -D flag to skip running the unit test suite since it’s not relevant here. We are also using the -P flag to specify the Spring Boot properties file to use for configuration parameters. In this case we are using the production configuration.
Once this command runs, it will deposit our freshly built JAR file in the target folder in the project root.
The next step is to create an AWS account and log into the AWS console using this account. This is a straightforward process that can be completed at https://aws.amazon.com. You will also probably want to set up your billing information since at some point AWS will start charging to use their services.
Next we will navigate to the Elastic Beanstalk service, create an application container, and set up an environment inside it with our deployed code:
a) After logging into the AWS console, click on the Services link in the top left of the screen.
b) In the Compute section, click the link for Elastic Beanstalk or search for it in the search box.
c) Click on the Create New Application link in the top right of the screen.
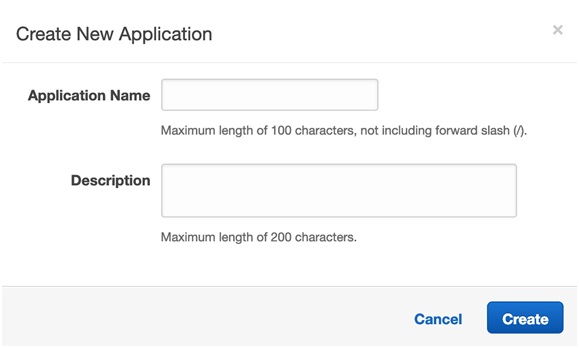
d) Enter a name and description for the application and click the Create button.
e) Click on the Create one now. link to create a new environment in the new application.
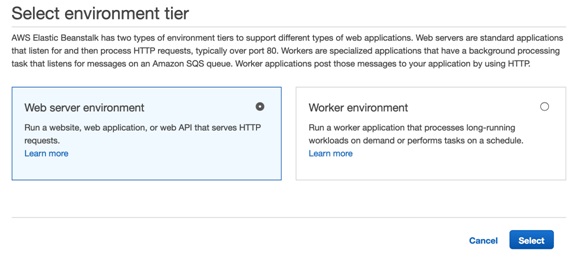
f) Choose Web server environment and click the Select button.
g) Scroll down to the Basic configuration section, and choose Java from the Preconfigured platform dropdown menu.
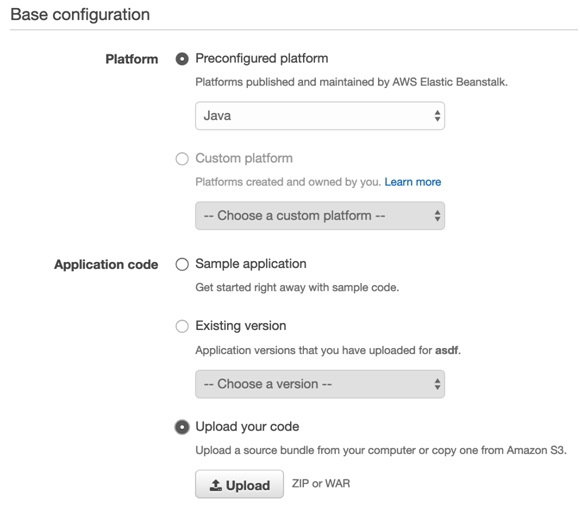
h) Scroll down and choose the Upload your code radio button in the Application code section.
i) Click the Choose file button, browse to and select the JAR file created above, and click the Upload button.
j) Click the Create environment button.
At this point, AWS will take a few minutes to spin up your environment. Once complete, it will provide a URL, which you can use to access your application in an Internet browser. Note that depending on your specific setup, there is a chance you may need to tweak some of the security and/or configuration settings in the Elastic Beanstalk environment, or in your Java app itself before your application will work properly.
Now that your application is up and running, you’ll notice that Elastic Beanstalk has some additional features that make monitoring, updating, and troubleshooting a breeze. High level monitoring is achieved by a Health check on the environment page which appears as a large green checkmark when healthy. When issues are detected, this icon will turn red and the causes will be identified. To the right is the Upload and Deploy button, which will allow you to easily upload a new version of your Java JAR, file and redeploy it at the click of a button.
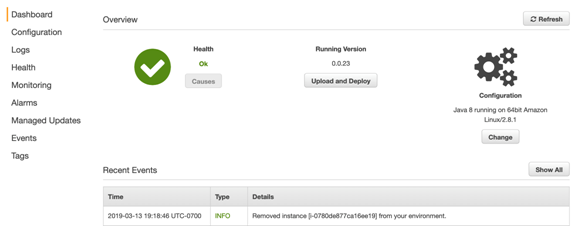
Scrolling down on the environment page shows a table of recent application events, and detailed logs can be accessed on the left sidebar for more in-depth troubleshooting. Of course all of these features can be described in much more detail, but that is out of scope of this article. My purpose here is just meant to describe how I deploy my web application and give you a taste of some of the convenient features offered by AWS.