
In the day and age of the rapid growth of WordPress-built sites, the number of hosting companies is increasing as the number of users is multiplying, and in this expanding universe, millions of sites are being migrated from one place to another. More often than not, behind each site is a one-(wo)man-army, a blogger, or an entrepreneur, and at the same time that one person is a webmaster as well. Taking care of a WordPress site implies securing it from data loss, in form of creating site backups, and not only that, but also migrating the site to a new server, hosting agency, or a new domain.
For an average WordPress site owner, the thought of migrating a site will probably cause instant discomfort, as the job can be complicated, and sometimes, things can go wrong. But this doesn’t have to be a stressful task, and things don’t have to go in unwanted ways, even if the site owner doesn’t have advanced knowledge in websites and hosting. WordPress plugins exist to make things easier and more convenient to site owners, and as for many other plugin categories, so it is the case in the category of backups and websites migration.
Speaking about WordPress users who are looking for a simple and fast solution to migrate a website, the Backup Migration plugin is a free tool that was made with a focus on making the entire process of migration as seamless as it can be. Besides creating site backups, this plugin can finish the site migration (or restoration) in just several clicks.
Backup and Migration procedure
The complete process of creating a site backup and migration will be explained in a few simple steps:
- First, you need to install the Backup Migration plugin on the source site. You can do so directly from the WordPress Dashboard, or you can manually download the plugin for free from the WordPress plugin directory: https://wordpress.org/plugins/backup-backup/.
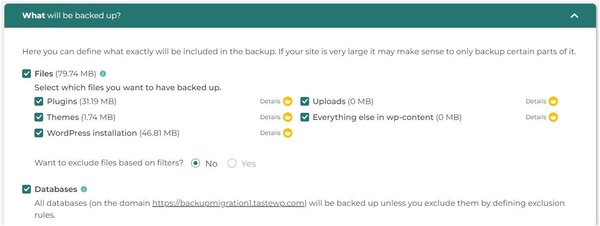
- Once you have the plugin installed on your site, navigate to its page in the WordPress Dashboard, and then to the section “What will be backed up?”, where you should select all files, folders, and databases without any exceptions, and then Save. This means that a full site backup will be created.
- By clicking on the “Create backup now!” button, the plugin will start the backup creation process, which usually takes just a minute or two for smaller sites – depending on server configuration and database size, of course. For backup creation on websites larger than 2GB, you will need a premium Backup Migration plugin. Once the backup creation is finished, you have the option to download the backup file, which is a good common practice, to keep the backup file on a local machine.
- After the backup process is done, it is time to set the destination for site migration. In both cases of migrating to another domain, or moving entirely to another hosting provider, a new, clean WordPress installation needs to be set up. In case when hosting provider doesn’t offer this, nowadays a common feature, a one-click installation, it is still not overly complicated to set up a fresh WordPress site manually. The Backup Migration plugin needs to be installed on this destination site, as described in the first step, for the source site, as soon as the new WordPress instance is operational.
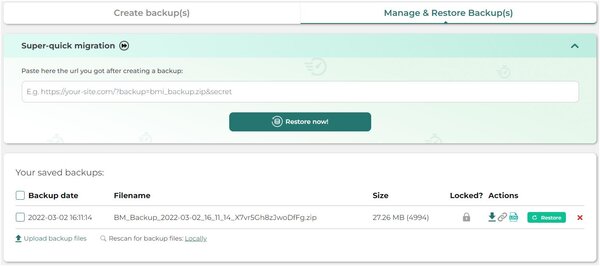
- Once the destination site is prepared, it is time to restore the source site on it. On the Backup Migration plugin, section Manage & Restore Backup(s)”, there are two options to restore a backup from the source site. For cases when the site is moved to a new domain, option A is a proper choice, and for the cases when domains remain unchanged, then option B is more suited, as in this case, site owners will need to take down the source site before making a new website go live:
- A. Super-quick migration – for this feature to be used, a user needs to paste the link of the backup file from the source site and hit the “Restore now!” button. These backup links can be acquired in the same plugin section, “Manage & Restore Backup(s)” (by clicking on the little link icon).
- B. Upload backup files – found in the same plugin’s section, is a feature used to manually upload the backup zips, and both file selection or drag-and-drop is available. Once the backup file is uploaded, the restore process should be started, by clicking on the “Restore” button located to the right of the listed backup file.
With this last step, the migration process is completed, and the source site is restored in its entirety to the new location. The old site can finally be archived now, but in the cases when owners want to keep the old site online, it is usually a good practice to set up proper redirections from the old domain to a new domain, and an equally simple Redirection plugin with a similar interface can quickly help you with that.
Additional advice for backup creation and website migration
- Handling big files
In a lifetime of an average WordPress site, hundreds of files and folders are created, uploaded, and duplicated. Among those files are frequently ones that are unused, obsolete, or simply forgotten. While we won’t question how often any site owner does the cleanup of the website and files on it, a site migration can be an ideal time to finally say goodbye to some old files and thrash them. An easy way to do this cleanup of sorts is to use exclusion rules in the Backup Migration plugin, which are previously mentioned in step 2 earlier in this article.
In out-of-the-box state, the Backup Migration plugin comes with some exclusion rules already set, specifically, 100MB and bigger files are excluded, which are, on coincidence – often old backup files. One-of-a-kind badly compressed video long forgotten can be another example of an unused large file, but there can be many more examples of course.
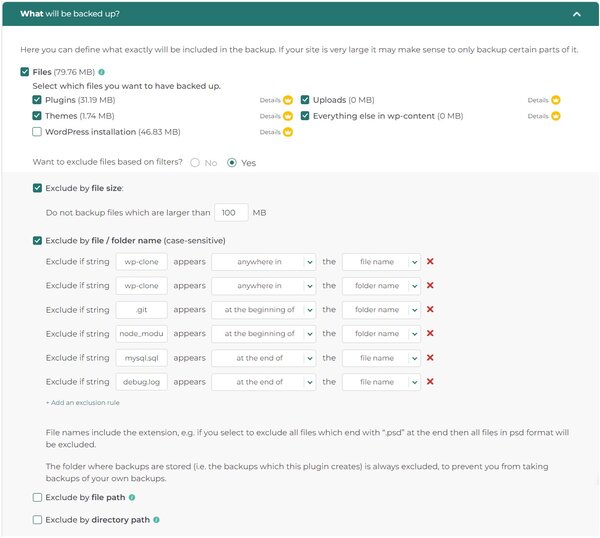
For those too afraid to lose anything still of value, there is a full log of excluded files during the backup creation, so Backup Migration users can monitor which files are actively being excluded. In cases when big files are indeed still being used on the site, users can still consider moving them manually, as such action will significantly speed up the backup process. On the other hand, if there are large files on the site, of which the webmaster is well aware, they can be excluded directly by file path, file name, or a unique string.
- Handling big database
Bigger files such as the above mentioned videos, photos, or audio files might certainly make a website and its backup file larger, but not make the backup process significantly more complex. Huge databases on the other hand affect things differently, and sometimes require extra efforts during website migrations.
Backup Migration plugin developers worked on the advanced features that target this specific portion of the website, and these special features can ensure that the backup and migration process is fluid even on slower servers. In fact, these circumstances are often the very reason why some websites are being migrated – they outgrew the hosting servers (or hosting plans).
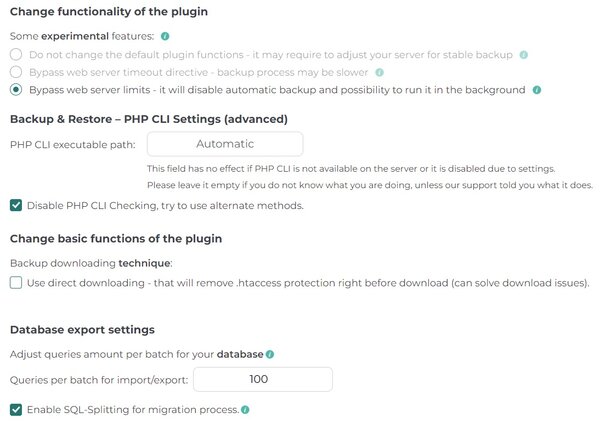
Backup Migration’s database-related settings are located in the section “Other Options”, and in these cases, they should be set accordingly:
- Bypass server limits (options 2 or 3);
- Disable PHP CLI checking and use alternate methods;
- Database queries per batch set to 100;
- SQL-Splitting enabled.
Conclusion
While migration of the WordPress site used to be a job where the average site owner usually looked for a paid helping hand to do it, or for a hosting agency that does this as an additional service, nowadays this job can be done solely and safely by the site owner, without much time and resources spent. Simplified migration tool like the Backup Migration plugin reduces the steps required as well as time spent for the webmaster, but can also serve beyond this task of migration. Automatic backups are also one of the integrated features of this plugin, so scheduling those seems like a logical next step once the new site has settled in.